
How to Use Inquiry – Product Catalogs
There are multiple ways of searching for products within SnapTracker. One is using the Product Catalog inquiry. The Product Catalogs are uniquely tailored to showcase specific product offerings for specific audiences. Catalogs are designed to show a visual representation of different product categories and individual products. Product Catalogs can be organized in a way that you as a shopper best understand the product instead of general Standard Classes used in Quick Search and Product Search.
See the following articles for more information on using Product Catalog inquiry:
Before starting, make sure:
- You are logged into SnapTracker.
- You have access to at least one catalog.
This post outlines the process of inquiring and adding products to a cart using a Product Catalog.
There are multiple ways to access a Product Catalog in SnapTracker:
- Directly from the Home screen.
- By clicking Products from the header section or main menu.
- By going to Inquiry and selecting Product Catalogs.
1. In the header section, click Products.
Note: When you log in to SnapTracker, the content of the first Product Catalog you have access to displays on the Home screen. In the screen shot below, the Accessories, Chairs and Desks are different sections of the Product Catalog.

2. To select a catalog, click the catalog name.
The main level of the selected catalog displays.

3. Alternatively to access the Product Catalog screens, click Inquiry in the header section.

4. Click Product Catalogs.
The main level of the first Product Catalog you have access to displays.

Observe the Product Catalog screen.
- Product Categories – Images of the different groups or sections display showing how the products are organized within the catalog.
- Search Filters – Search inputs and options, including an Advanced Search pop-up.
- Catalogs – Displays all available catalogs you have access to.
- Table of Contents – List of all the product categories in the current catalog and is displayed at every level of the catalog.

5. To view the details of a specific catalog category, click the Category image, or from the left navigation, click the link in the table of contents .

6. The subsequent categories in the next level displays, if available.
Click the Category image in the next level, or from the left navigation, click the link in the table of contents.
Note: There may be more than one level within the category. For example, Chairs could be sub-divided by type of chair such as Task, Guest and Conference.

At the end of the catalog tree, the Standards in the selected category display.
The results are sorted either by Standard or Model No., based on your user settings.

7. To change the way the results are sorted, click the Sort By dropdown to sort the results by Standard or Model No.

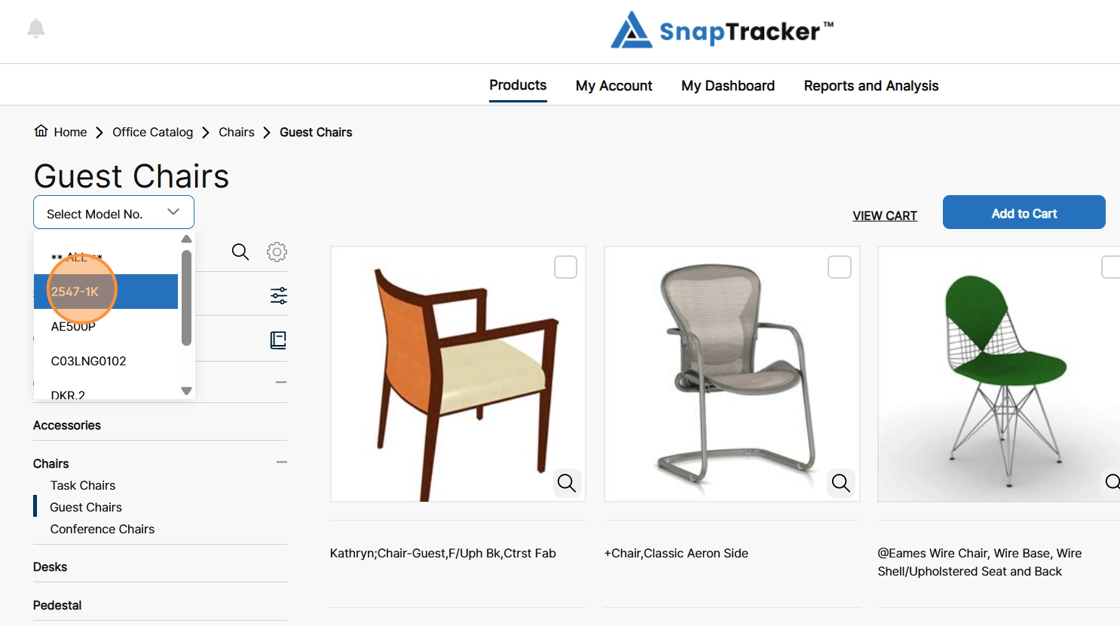
8. To filter the results by a specific Model No., from the left navigation, click the Select Model No. dropdown and select a specific Model No. To view all, select All.
9. To see which catalog you are currently viewing and which catalogs are available to you, click the catalog icon.
Your available catalogs display, with the current catalog indicated.

10. To add a product to a cart from the card view, click the checkbox beside a desired product to add one unit.
To add the product to your cart, click Add to Cart.
Note: You can check more than one product at a time to add to your cart.

11. To add a quantity of more than one to the cart from card view, click the magnifying glass within a Standard’s image.
The Quick View pop-up screen displays.

12. In the Quick View pop-up, enter the desired units in the Quantity field.
To add the product to your cart, click Add to Cart.

13. To view additional details for a Standard, click the Standard’s image.

The Product Summary screen displays.
The Product Summary screen provides additional information about the selected Standard along with a larger image. The Standard Summary section can be shown or hidden by toggling Hide Summary on or off.
Note: You can also add product to your cart in the Product Details screen.

Additional information can be accessed from the Product Summary screen by clicking Details.

The Product Details pop-up screen displays.
Information included on the screen includes:
- Image – Assigned Standard image.
- Standard – The Standard. This is the unique identifier in SnapTracker for a specific model number combined with specific options and finishes.
- Manufacturer – Manufacturer of the product.
- Catalog Id – Catalog Id is the manufacturer’s defined product line.
- Model No. – The model number. This is the Manufacturer model number for a product.
- Standard Class – The product category defined in SnapTracker.
- Created Date – The date the Standard was created in SnapTracker.
- Price – The Standard purchase price. This may or may not display based on user settings.
- List Price – Manufacturer list price. This may or may not display based on user settings.
- Discount – Discount rate applied to the List Price. This may or may not display based on user settings. There are different options available. Discounting could be:
- List Less %
- Cost Plus %
- Margin %
- Manufacturer Price List – The Price List name or number defined by the Manufacturer.
- Last Updated Date – The date the Standard was last updated in SnapTracker.
- Description – The description of the Standard.
- Full list of options and Finishes – The list of options and finishes assigned to the Standard, making it a unique item.
You can print the Product Details pop-up screen by clicking Print.
You can close the pop-up by clicking X.

14. To add product to your cart in the Product Summary screen, modify the Quantity field (if required) and click Add to Cart.
Product is added to the cart.
