How to Configure Initial Settings on the PDA?
The initial settings screen enables you to configure the following information:
- Operator
- Use KiSP Label
- Validate Label Sequence
- Auto Increment
- Enable Record Editing
- International Date Format
- Link to Connection Settings
This post outlines the process for configuring the Settings required to execute any of the SnapTracker collection routines on the PDA.
Note:
Resetting the date or time on the PDA is completed in the Windows CE System Settings menu.
Step-by-step instruction
1. On your PDA, from the Tools menu, select Settings.
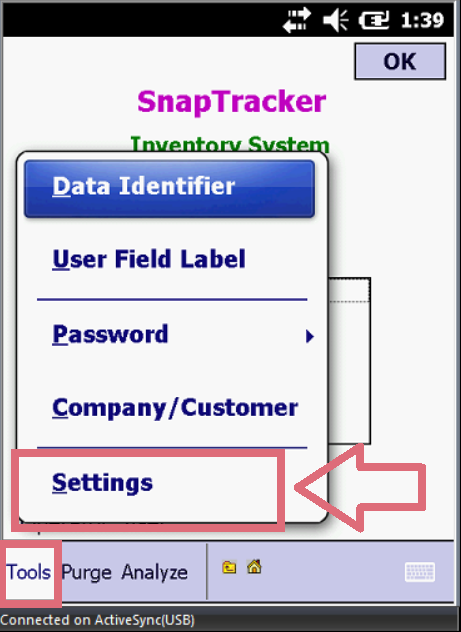
The Initial Settings screen displays. Here is a quick summary on what each field on the screen means:
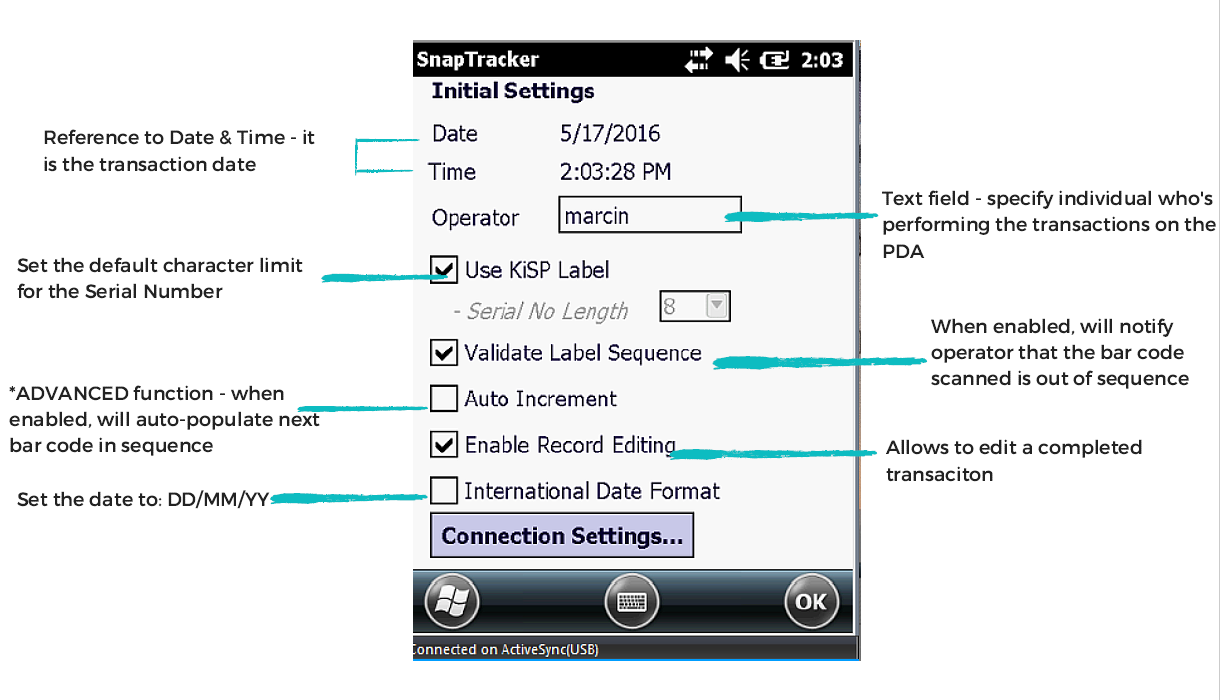
2. In the Operator box, enter the operator using the PDA.
Note: You may change the Operator by clicking on the Operator box and entering the individual’s name with the naming convention decided upon, using the PDA keypad or the on screen keyboard.
3. Ensure the Use KiSP Label box is selected if you are using KiSP Labels.
4. Select / deselect the Validate Label Sequence box.
Note: By default the Label Sequence is selected. When selected it warns the operator when a serial number entered is out of sequence. The Label Sequence Check functions during the Add-Asset and Mass Asset Add routines.
5. Select / deselect the Auto Increment box.
Note: By default the Auto Increment function is not enabled. When this function is enabled in an Asset routine the Auto Increment will automatically select the next serial number in sequence once the previous record has been entered into the PDA. If this function is disabled then the inventory screen you are in will refresh and this field is blank.
6. Ensure the Enable Record Editing field is selected if you’d like to edit a completed transaction.
Note: By default the Enable Record Editing is selected. When selected this enables the operator to edit any records that have already been entered on the PDA. In each Inventory screen you will notice a drop-down selection box with numbers. If the Record Editing is disabled you may use this device to view previous records entered into the PDA or completely delete a record.
7. Deselect the International Date Format if you prefer the DD/MM/YY format.
Note: This field is primarily for European countries where the date format is different.
8. Configure Connection Settings if needed.
Note: The Connection Settings screen contains information, which needs to be populated in order for the PDA to upload successfully. To learn more, please visit the How to Configure Connection Settings post.
Related Webinar
We cover the Initial Settings among other topics in the PDA webinar series! Learn more